
Thank you again for agreeing to speak at the OpenSimulator Community Conference 2013! As we get closer to the event, we wanted to give you more information about how to prepare for your presentation.
Table of Contents
Presentation Technical Requirements
Connecting & Logging In to the Conference Grid
Preparing Slides & Images for Display In-World
Using the Presentation System In-World
Audio & Video Streaming Your Presentation
Example Presentation Timeline (9:30 Session)
In the Event of Technical Difficulties
Speaker Q&A Sessions
Presentation Technical Requirements
The OpenSimulator Community Conference 2013 will take place entirely online in an OpenSimulator grid designed specifically for the event. If you have never given a presentation in OpenSimulator before, we encourage you to log in and get comfortable with the interface well in advance of the event.
In order to have a smooth experience, we recommend the following technical parameters for your local setup:
- Your computer should be connected to high speed internet via ethernet cable; wireless access is not recommended.
- Ideally, your computer will have a modern processor and a video card with at least 512MB of RAM. In general, the better your processor and video card, the better your experience will be. Desktop computers generally perform better than laptop computers, unless you have a laptop specifically configured for gaming or video intensive applications. You will not be able to present from/on a tablet or mobile device.
- Speakers must use a headset microphone, preferably with a separate mute/volume control. Unfortunately, built-in microphones on laptops and computers can allow other sounds to bleed through the stream, causing painful echo loops and distortion for other speakers and audience members, therefore, we require all speakers to use a headset microphone for their presentation. If you do not have a headset microphone, please purchase or borrow one prior to your presentation.
- If possible, try to limit any distracting ambient noises in your local environment such as fans, barking dogs, ringing cell phones, etc. We will be streaming your audio output both to the virtual conference center on the OpenSimulator grid, as well as through the live UStream channel, so it’s important that your audio quality be as clear as possible.
Connecting & Logging In to the Conference Grid
To connect and log in to the conference grid, you will need to use a special client called a “viewer”. We highly recommend that speakers use the OSCC Viewer, a customized viewer we have developed specifically for the conference that is pre-configured with all of the connection details necessary to connect to the conference grid.
Speakers may also have one of two different types of accounts – a local account, which will have a first name and last name like “Joe Smith”, or a hypergrid account, which will be in the format firstname.lastname@yourgrid.com:8002. Refer to the email you received when you registered for the conference to see which type of account you selected.
Logging Into a Local Account Using the OSCC Viewer
To download the OSCC Viewer, please choose the correct version for your operating system:
Download OSCC Viewer for Windows
Download OSCC Viewer for MacOSX
Download OSCC Viewer for Linux
After downloading and installing the conference viewer, double-click the green and white OpenSimulator icon to launch the software. At the bottom of the screen, you will see a field to enter your avatar first and last name (example: Fleep Tuque) and password, and the 2013 OpenSimulator Community Conference grid should be pre-selected in the Grid pulldown menu.

Enter your username and password and click the “Login” button to enter the conference grid. You should log in to a Landing Zone region that will have maps and signage to help you locate the appropriate Keynote region or Breakout Zone for your track presentation.
Logging Into a HyperGrid Account Using the OSCC Viewer
To download the OSCC Viewer, please choose the correct version for your operating system:
Download OSCC Viewer for Windows
Download OSCC Viewer for MacOSX
Download OSCC Viewer for Linux
After installing and launching the conference viewer, you will need to add the connection details for your home grid to the OSCC Viewer grid manager.
To add your home grid connection details:
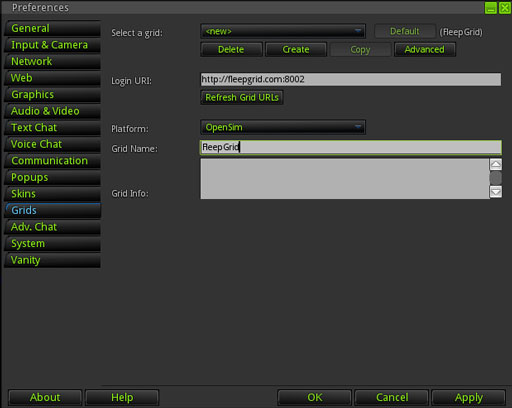
1. Click the “Grid Manager” button at the bottom of the screen
2. Click the “Create” button at the top of the window that appears to create a new grid entry.
3. Enter the LoginURI of your home grid in the appropriate field.
4. In the Platform pull-down menu, select OpenSimulator.
5. Enter the name of your home grid in the Grid Name field.
6. Click the “Apply” button.
7. Click the “OK” button.
You should now be able to enter your username and password, and select your home grid in the Grid pull-down menu to login.
Once you have logged into your home grid, you will need to make a hypergrid jump to the conference grid. It is very important that you make sure your avatar has fully loaded on your home grid before making the hypergrid jump! If you do not wait for your avatar to fully load on your home grid, you may appear as a persistent cloud when you jump to the conference grid.
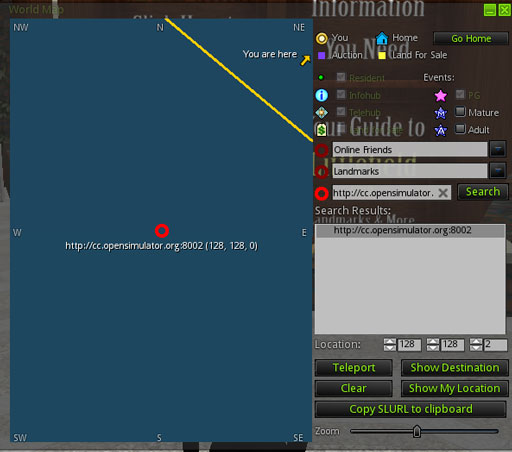
To HyperGrid jump to the conference grid, click the “Map” button at the bottom of your screen, and enter the following into the “Search” text field on the right side of the map:
http://cc.opensimulator.org:8002/ (note the trailing slash)
Then click the “Teleport” button at the bottom of the screen to teleport to a Landing Zone on the conference grid.
Logging Into the Conference Grid Using a Different Viewer
Experienced OpenSimulator users may wish to use their own preferred viewer client. If you wish to use a different client, it must natively support Mesh and Media-on-a-Prim in order to function properly for the conference . Imprudence and other non-mesh clients are not recommended or supported for the conference.
To configure your viewer to connect to the OpenSimulator Community Conference grid, you will need the following connection information:
LoginURI: http://cc.opensimulator.org:8002/
Grid Name: 2013 OpenSimulator Community Conference
The HyperGrid address is the same as the LoginURI, and the conference grid is located in the 7000, 7000 coordinate range. If necessary, you may need to navigate to a jump region that can reach a destination in the 7000,7000 coordinate range. OSGrid provides public jump regions for this purpose, see the list at http://www.osgrid.org/index.php/hypergrid
Please note that conference staff will not be able to provide support for any viewer other than the OSCC Viewer.
Return to Top
Preparing Slides & Images for Display In-World
Preparing Your Slides
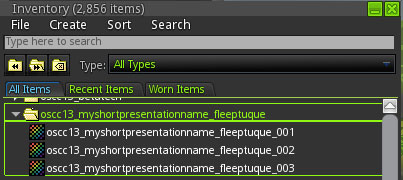
The presentation system can display slides and static images in JPG or PNG format. PDF files can also be used by converting the PDF document to a set of image slides (see below). If you designed your slides in PowerPoint, you can use File > Save As.. to save your images as JPG or PNG files. Be sure to select “Save All Slides” when prompted and it is very important that you rename the resulting slide images with a filename that includes your presentation name and at least a TWO DIGIT slide number to ensure your slides display in the proper order. For example:
slide1.jpg
slide2.jpg
slide3.jpg
Should be renamed to something like:
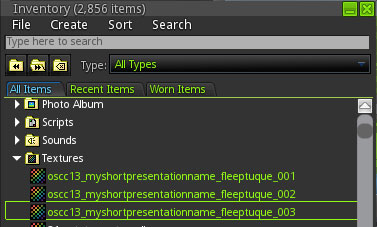
oscc13_myshortpresentationname_fleeptuque_01.jpg
oscc13_myshortpresentationname_fleeptuque_02.jpg
oscc13_myshortpresentationname_fleeptuque_03.jpg
If your slide deck has more than 99 slides, use a three digit numbering system, and if you run into trouble or have problems, we can help you during the Speaker Q&A session.
Uploading Your Slides to the Conference Grid
Once you have your slide images all renamed, you will need to log into the conference grid to upload your images. HyperGrid users, it is very important that you log into the conference grid and upload your slides there instead of uploading on your home grid! This will help minimize any permissions issues.
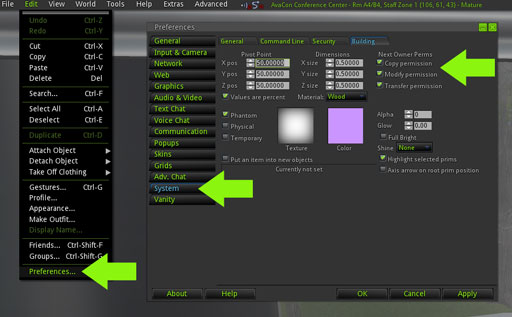
Once you have logged into the conference grid, the first thing you need to do is set your viewer to automatically give all uploaded images full permissions so that the images can be displayed for the audience. In the OSCC Viewer, go to Edit > Preferences > System tab > Building Tab and check the boxes for Next Owner Permissions to Copy, Modify, and Transfer, and then click Ok.
Next, upload your slides using File > Bulk Upload.. to select all of your images.

The resulting textures will be automatically added to your Inventory inside the system “Textures” folder.
Organize the textures into a new folder, right-click My Inventory > New Folder and be sure to name the folder something that makes sense.

Drag your slide images into your new folder to keep them organized.
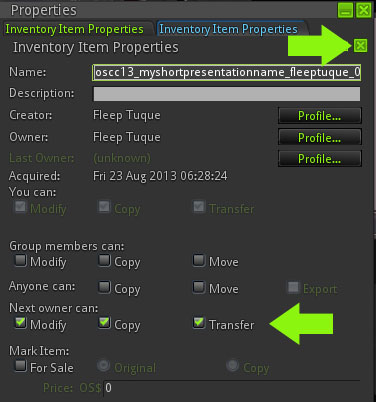
IMPORTANT! You MUST make sure all of your images are FULL PERMISSIONS in order for them to display properly for the audience.
If you skipped the first step to configure your viewer to automatically make uploaded images full permissions, you will need to set your slides’ permissions manually. To make your images full permissions, highlight all of your slide images and then Right Click > Properties to open the window to manage permissions. In the pop up window, check the boxes for Next Owner Can: Copy, Modify, Transfer, and then click the small x to close the permissions for that slide, and then repeat the process for all of the rest of your slides.
Converting a PDF Document to Image Slides
If you designed your presentation as a PDF, or used a system like Prezi or other system that can output your slides as PDF files, you can automatically convert your PDF to image slides using a special tool designed for this purpose in the conference grid. Be sure to save out your PDF file in at least 150 dpi resolution, then to convert your PDF to image slides:
1. Log into the conference grid.
2. Open the Map, and search for the region “vLab” and teleport to the destination.
3. At the podium in the room, right click and choose to “Sit” at the presenters seat.
4. On the podium display, click the Green Down Arrow to launch the upload webpage
5. A notice should appear in the upper right corner of your screen, click “Go to Page” to visit the website.
6. On the web page, choose and upload your PDF file.
7. You will see the images processing on the podium display. When it has finished, click the yellow folder icon to download your converted image slides.
Your image files will appear in a new folder in your Inventory named according to your original PDF file name. The image slides are automatically numbered in the conversion, so you should be all set!
Return to Top
Using the Presentation System In-World
The conference presentation system offers a variety of ways for you to show visuals during your session. Presenters may also bring or build small displays, demonstration objects, posters, etc. that can be placed either on the stage in front of the auditorium, or there is additional space behind the audience seating. We highly recommend that speakers bring at least a draft version of their converted slide images and any builds or displays to the Speaker Q&A session so we can troubleshoot any potential issues in advance!
Before using the Presentation System, you should have already prepared your slide images as described above. If you haven’t completed that step, please do that before continuing!
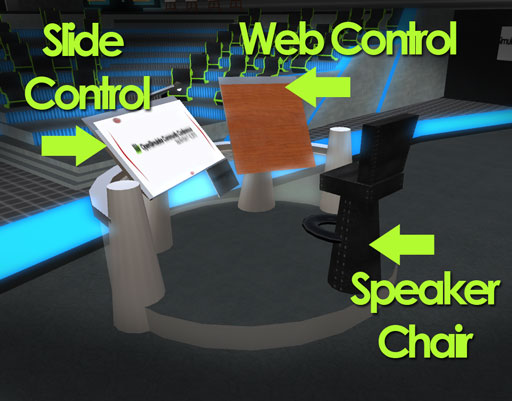
The system has two main components – the Main Screen that the audience will see, and the Podium, where you will be in control of what is displayed.

The Podium itself has three components – the Speaker Chair, where you will sit in order to “take control” of the system, the Slide Control podium, where you can control what slides are displayed, and the Web Control podium, where you manage which websites are displayed.
STEP 1: Sit In the Speaker Chair
To begin, right-click on the Speaker Chair and choose to “Sit”. The podium should acknowledge that you have gained control of the presentation system in local chat.
When you sit down, the system will automatically center your camera view on the two control panels, but at an angle where you will still be able to see the audience as well.
STEP 2: Load Your Images Into the Slide Control
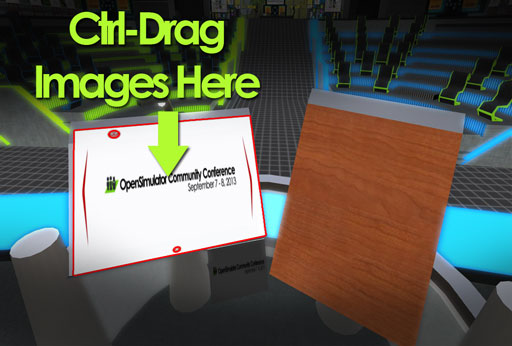
The next step is to load your prepared slide images into the Slide Control podium. Locate your slide images in your inventory and shift-click to highlight all the slide images at once.
Then, hold down the CTRL key and CTRL+DRAG the images onto the center of the Slide Control podium. You should see the podium highlight in red while dragging the images over.
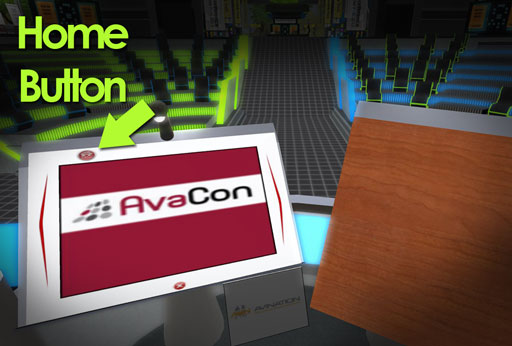
STEP 3: Restart the System and Scroll Through Your Slides
Next, click the red “Home” button at the top of the Slide Control to reset the system and load your slides. A pop up notice will ask if you wish to start from the beginning, choose “Yes”. You should then see your first slide appear in the center of the panel. Note that the smaller, greyed out panel below will preview your next slide at the same time.
To scroll through your presentation, use the narrow red arrows on either the left or the right side of your slide. You can also left click anywhere on the slide to “point” on the image – a red pointer will appear on the large screen the audience sees wherever you clicked. This is useful to point out specific areas of your slide.
If you only have slide images to display, that’s it! That’s all you need to know to use the presentation system! When you’re finished, click the red X at the bottom to delete your slides from the system.
Displaying Live Websites, Including Audio/Video (Media-on-a-Prim)
The conference presentation system can also display live websites using the Media-on-a-Prim (MOAP) feature. Keep in mind that that each person viewing the website is seeing their own individual version of the page, so while you can change the page being displayed, each person’s interaction with the page is unique to their view. If you have not used MOAP in a presentation before and plan to use it in your session, we highly recommend practicing with an audience at your track Speaker Q&A session. For a technical explanation of how MOAP works, please see: http://opensimulator.org/wiki/Media_On_A_Prim.
STEP 1: Switch from Slide Display to Website Display
You should still be sitting in the Speaker Chair to be in control of the presentation system. To switch the display from Slides to Websites, simply click the wood textured podium on the right. A floating action bar will appear over the podium, where you can click to enter the URL of the website you wish to display.
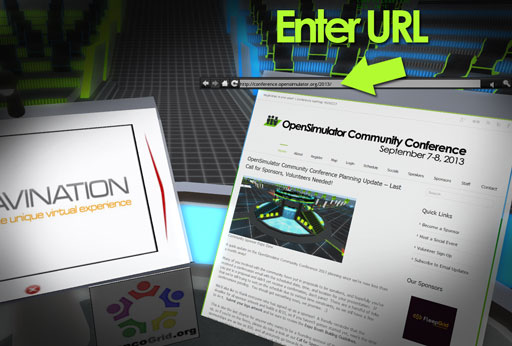
STEP 2: Enter Your URL
Enter your URL address in the text field and hit enter. As soon as the website loads, your audience will see the same website you see. Remember however that each person’s view of the website is unique, so they will not see any interaction you perform on the webpage. If you need to click to start a video, for example, you will have to ask the audience to do that individually on their own view of the website.
STEP 3: Switch Back to Slides
To switch back to showing your slides, simply click on the Slide Control podium on the left, and the website display will automatically disappear for your audience. You can switch between slides and websites at any time by clicking the appropriate panel.
Return to Top
Audio & Video Streaming of Your Presentation
Your presentation will take place inside the OpenSimulator conference grid, but it will also be filmed and live streamed to the web audience on UStream, so it is important that you remember both audiences. For example, if you respond to a text-chat question from a moderator or in-world audience member, it would be helpful if you repeated the question before answering so the web audience hears the question as well.
Audio Streaming
Although OpenSimulator offers built-in voice tools, we will not be using those tools for the audio in your session. Instead, we will use Skype to conference you in with the streaming team, and then our audio technicians will stream your voice out to the in-world and web audiences.
To prepare for audio streaming your presentation, make sure you have followed these steps:
1. Connect your headset/microphone to your computer prior to launching Skype. Remember that presenters must use a headset/microphone – open microphones will not be permitted for your presentation.
2. Download and install Skype if it isn’t already installed on your computer: http://www.skype.com
3. Create a Skype account if you don’t already have one, and log in to familiarize yourself with the interface.
4. Click the “Add a New Contact” button and send a contact request to “fleeptuque” to be added to the OSCC13 Speakers group on Skype. Note that this Skype channel will serve as our backup communication channel if the conference grid experiences technical difficulties.
We will practice connecting and speaking through Skype at the Speaker Q&A session so you get a feel for how the audio will work at the conference.
Video Streaming
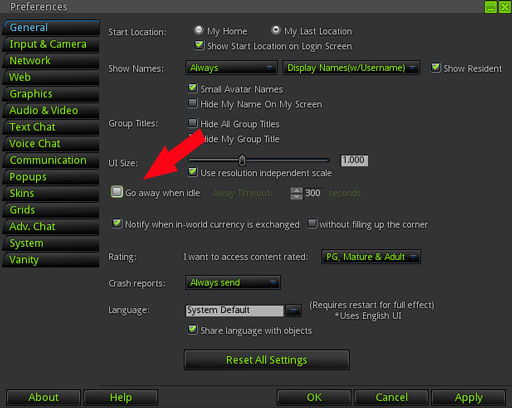
Our streaming team will have film crew avatars strategically placed in the auditorium to film and live stream your session to the web audience. For the most part, you don’t need to do or worry about anything for the video streaming, however we do recommend that speakers configure their viewer to turn off the automatic “AFK” feature to ensure that you don’t “go to sleep” in the middle of your presentation. This sometimes happens if you have not interacted with the screen after a certain period of time.
To disable the automatic “AFK” feature in the OSCC Viewer, log into your account and then from the top menu select Edit > Preferences > General Tab > UNCHECK the box “Go away when idle”. If you are using a different viewer, you should find a similar option under that viewer’s preferences as well.
Return to Top
Example Presentation Timeline (9:30 Session)
9:00AM
Teleport to the region where the presentation will take place. If the region is full and you can’t get in, alert conference admins using the Skype OSCC13 Presenter channel.
9:20ish AM
The Streaming Team will pull you and any co-presenters and the session moderator into a chat or call on Skype. They may do a quick test call to check your connection and audio levels. Simultaneously, you need to make your way to the stage and sit on the black chair at the center podium to add your slides to the presentation system.
9:25AM
You, the moderator, and the streaming team will all be in the same Skype channel and the call will start shortly before the presentation begins. This is a good time to check with the moderator and let them know how you want to handle Q&A for your session. Note that some moderators may not feel comfortable triaging questions and you may need to handle this yourself.
9:30AM
The Streaming Team will let you know when the stream is live, and the session will begin with the moderator introducing you and reading your (brief) bio. Please make sure your microphone is muted when you are not speaking! When the moderator finishes the introduction, you can begin speaking and and giving your presentation.
10:10AM
Approximately 10 minutes before the end of your session, your moderator will IM you to let you know to begin wrapping up. If you haven’t taken any questions yet and intend to do Q&A, you should probably start.
10:15AM
Approximately 5 minutes before the end of your session, the moderator will IM you to start wrapping up..
10:18AM
The moderator will close the session by thanking you and the audience and letting the audience know what will be happening in the next session. PLEASE BE SURE TO END THE SESSION ON TIME AS MUCH AS POSSIBLE. If the moderator has to “interrupt” you to end the session, please know they are just doing their job. Every minute your session runs late puts the next session behind schedule.
10:20AM
The Skype call is ended. You and the moderator leave the stage. Congratulations, you’re all done! 🙂
In the Event of Technical Difficulties
As you may know, OpenSimulator is “alpha” software, therefore, the OpenSimulator Community Conference is an experiment in capacity testing for OpenSimulator in addition to being a community event. Though every effort will be made to work through technical issues, in the worst case, it is possible (and even expected) that keynotes, presentations and other conference events and areas may suffer periodic disruption.
If this does happen, don’t panic! Depending on the nature of the technical difficulty, you may be able to continue giving your presentation through Skype for the web audience and archived video, even if the grid crashes.
Here are some tips to follow in the event of technical difficulties, given different scenarios:
Scenario 1: The Conference Grid or Region Crashes
If the conference grid or the region you are in crashes, but you are still connected to Skype, you should continue giving your presentation as if nothing is wrong. Your voice will still be streamed to the web audience, and our video team can insert footage or your slides in the video archive in post-production. If you have the mental bandwidth to continue your presentation and log your avatar back into conference grid when it comes back up at the same time, feel free to do so, but it is more important that we have a “clean” recording of your audio for the web audience and archived video than it is for your avatar to be standing in-world.
Scenario 2: Skype Crashes or Disconnects
Occasionally, Skype will crash or disconnect the call. If this happens, as quickly as you can, reconnect to Skype and rejoin the call. Our streaming team will be on-hand to assist you and your session moderator will keep both the in-world and web stream audience apprised of the situation. Once you’ve reconnected to the call, continue on with your presentation with a minimum of fuss about the disruption to minimize any post-production editing required by the video team.
Scenario 3: Your Computer Crashes or You Lose Power or Internet Connection
Sometimes the universe tests our patience with unexpected computer crashes or power or internet outages. If this happens, obviously your presentation can’t continue until you reconnect. In order of importance, reconnect to the Skype call first, and then log your avatar back into the conference grid.
If you are unable to reconnect after a few minutes, if at all possible, please call or text Chris Collins (Avatar: Fleep Tuque) to alert the conference team to your extended outage. In the worst case scenario, we will inform the audience about the technical difficulty, and if possible, either reschedule your presentation for later in the conference or work with you to schedule a time to film your presentation after the conference for the video archives.
Regardless of what happens, try to keep your cool and know that our conference team will be on hand to assist you and the audience to ensure that the show goes on!
Return to Top
Speaker Q&A Sessions
All speakers should plan to attend the Speaker Q&A Session for your track to practice connecting to the conference grid and troubleshoot any issues with your media, slides, or other presentation materials, and to answer any questions you may have.
-
August 24, 10AM PDT – Education Track Speaker Q&A
-
August 24, Noon PDT – Social & Communities Speaker Q&A
-
August 25, 10AM PDT – Developer & Opensource Speaker Q&A
-
August 25, Noon PDT – Business & Enterprise Speaker Q&A
-
August 31, 9AM PDT – Research Track Speaker Q&A
-
August 31, 11AM PDT – Art & Creativity Track Speaker Q&A
Keynote speakers and speakers who can’t make the date/time for their specified track are welcome to attend any of the Q&A sessions. If possible, we strongly suggest you have at least a draft of your presentation slides ready for the Speaker Q&A session so you can practice using the display system we provide. If you plan to use your own presentation system, please bring a copy with you to the Q&A session so we can test it and ensure that it works properly on the conference grid.
That should cover the preparation information you need to get ready for your presentation, but if you feel overwhelmed or confused about something, don’t worry. We will cover this information again at the Speaker Q&A sessions and you can of course feel free to contact your track leader at any time for assistance.
If you have any other questions or need any assistance whatsoever, please don’t hesitate to let us know. Thank you again for being a part of the OpenSimulator Community Conference 2013 program and we look forward to a terrific conference!

